Setup Guide for Ruby on Rails Testing on Github Actions with Minitest + Capybara + Chrome
2024-08-04
Works for Rails v7.1, Capybara v3.40. I am posting the actual codes used by OyenCov backend app code here.
This guide assumes that you will be using the default test framework -- Minitest, and not RSpec (the more popular but slower alternative).
Most of the instructions in Rails Official Guide - Testing - System Testing work out of the box, but if you want to make it work on Github Actions, there are still some tiny changes to be made. I will show you the codes to be copied-pasted and explain them in a bit.
In short, 4 steps:
- Install Chrome browser in your GitHub Actions workflow.
- Install the gems - Capybara and selenium-webdriver.
- Configure Capybara to use Chrome in headless mode.
- Verify and troubleshoot the setup.
Step 1 - Add Chrome into your GitHub Actions workflow
Have the Chrome browser installed before having the repo checked out.
# .github/workflows/test.yml
name: "Ruby on Rails CI"
on: push
jobs:
  testing:
    steps:
      - uses: browser-actions/setup-chrome@v1
      - run: chrome --version
      - uses: actions/checkout@v4
      # other steps follow
      # Update the rails testing step to make sure system tests are being run
      - name: Run tests
        run: bin/rails test:all
Remember to change the usual bin/rails test to bin/rails test:all. Or if you choose to run system test in the other, you can have workflows with
steps:
  # In workflow 1
  - name: Run all tests except system
    run: bin/rails test

  # In workflow 2
  - name: Run only system tests
    run: bin/rails test:system
Step 2 - Add the necessary gems
Add these 2 gems in Gemfile and run bundle afterwards.
# Gemfile
group :test do
  gem "capybara", "~> 3.40"
  gem "selenium-webdriver", "~> 4.20"
end
Step 3 - Configuring test suites to use capybara and browser
Let Rails generate the skeletons and boilerplates for you:
bin/rails generate system_test logins
And edit the test case superclass that system test cases will inherit from:
# test/application_system_test_case.rb
require "test_helper"

class ApplicationSystemTestCase < ActionDispatch::SystemTestCase
  driven_by :selenium, using: :headless_chrome, screen_size: [1400, 1400]

  def setup
    Capybara.server_host = "0.0.0.0" # bind to all interfaces
    Capybara.app_host = "http://localhost"
    super
  end
end
The difference between normal using: :chrome and using: :headless_chrome is that, in headless mode, no browser window appears. In most cases, the test cases work even faster in headless.
GitHub Actions environment has no GUI, therefore anything other than headless mode will cause the test to crash and fail. If you want to see how Capybara + Selenium work graphically, you can change to using: :chrome and see your pages being rendered etc.
Step 4 - Verify & Troubleshoot
Let's write a simple system test suite to test these things work. The test suite just involves going to the homepage and checking if a particular text exists.
# test/system/logins_test.rb
require "application_system_test_case"

class LoginsTest < ApplicationSystemTestCase
  test "visiting the index and sees sign in page" do
    visit "/"
    assert_selector "h2", text: "Sign into OyenCov"
  end
end
Once you are ready, run the test with
bin/rails test:system
# or
bin/rails test test/system/logins_test.rb
Once it works locally, remember to commit and push to GitHub and see if the changes work.
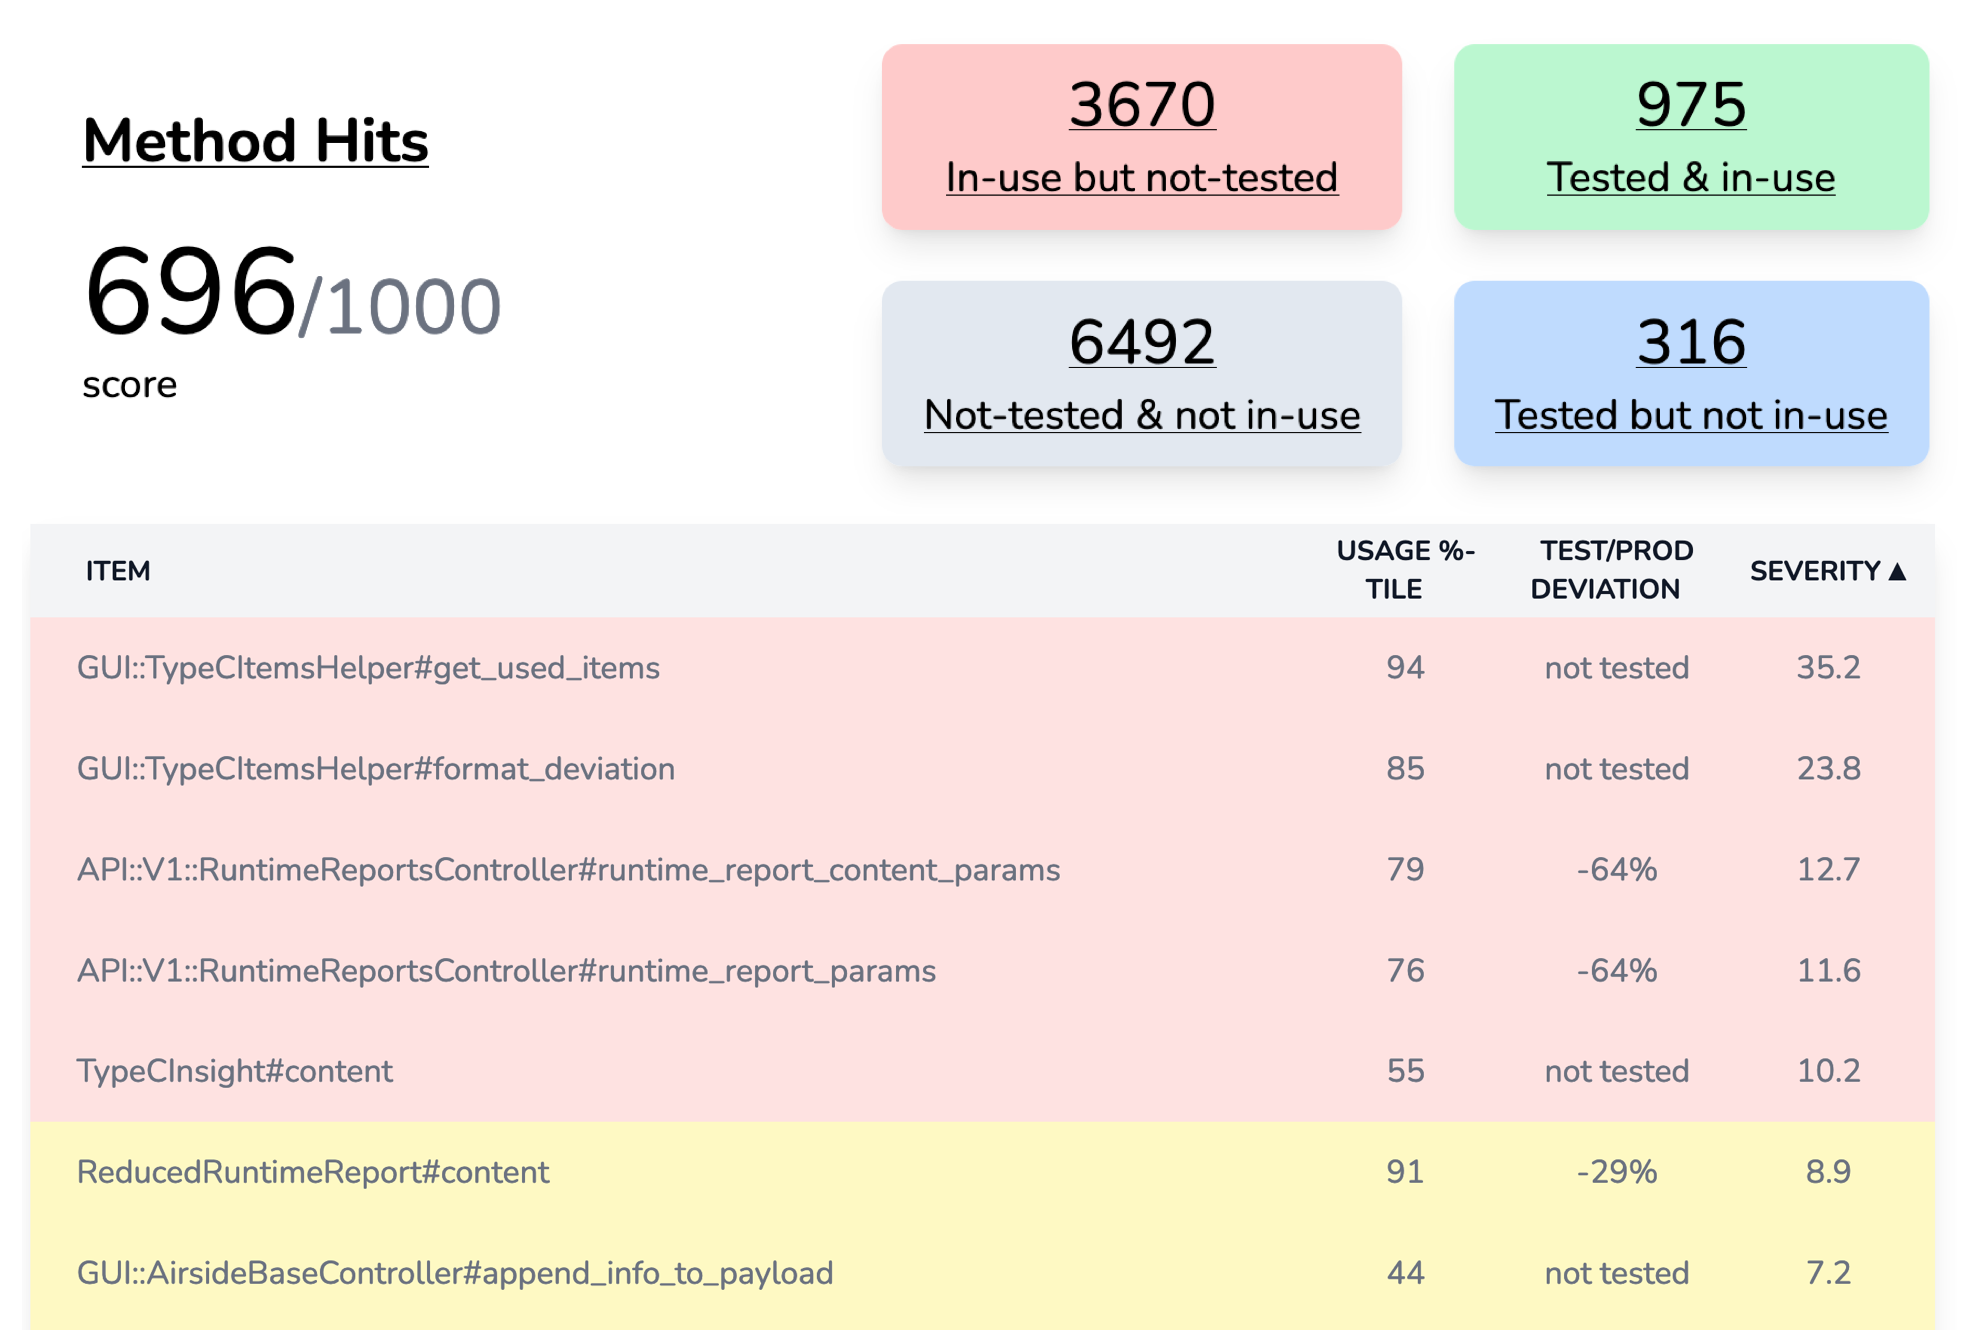
Measure test coverage based on codebase partial usages in real life
System testing is a key component of ensuring code quality. but if you just started off with a rather large codebase with far too little test suites, OyenCov can help you out by telling you which parts are being heavily used and tested too lightly.
Free Rails testing guides in your inbox!
We send new guides and product updates. 1 email per week at most. You can unsubscribe any time.